18 Hole Yardage : Blue Tees – 7202 White Tees - 6490 Red Tees – 5509

Hole 1 – Par 5 : Blue Tees – 610 White Tees – 537 Red Tees – 474 Hdcp.# 2
This scenic opening Par 5 hole features a split – level fairway that is in play for both the drive and second shot. The lower left side is bit wider and more receptive but there is a lake, from tee to green, just to the left of the cart path and a drive into the sloping bank dividing the fairway will usually necessitate a recovery “Chip Out”. A drive to the higher right side sets up a better second shot but calls for more accuracy due to two sand bunkers that guard the right edge of the elevated fairway. A very long drive down the middle can clear the fairway – dividing bank and set up a chance to reach the green in two But there are two bunkers guarding the left side and a steep slope with thick rough on the right. For most second shots there is less danger going to the higher fairway on the right and offers an easier approach shot to the green. The green slopes slightly from back left to right front. Par is good score!
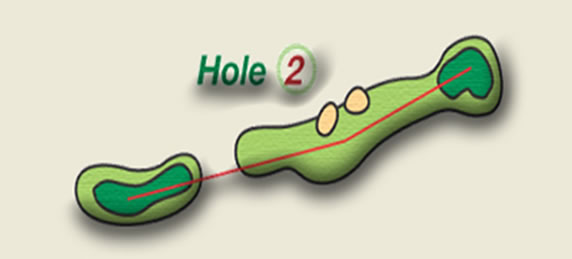
Hole 2 – Par 4 : Blue Tees – 400 White Tees – 371 Red Tees – 313 Hdcp.# 10
The second hole is a relatively short Par 4 with an intimidating tee shot. There is water all down the left side and fairway high rough with an uphill/downhill stance if you miss the fairway. The right side is more level but has two lakes that can come into play; one to catch any short fades or slices and the second that comes into play for a long fade. A decent drive down the middle sets up a mid – to – short iron approach hot to the elevated green. There are two traps to the front left of the green and a lake to the right and rear of the hole. This can be an easy par … if you don’t miss either of your first two shots.
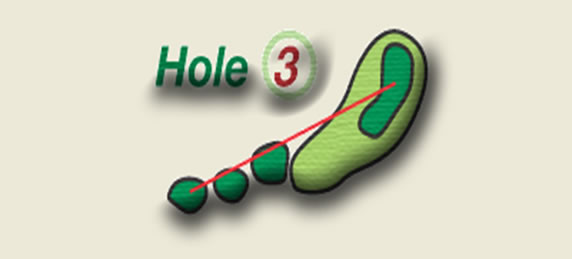
Hole 3 – Par 3 : Blue Tees – 183 White Tees – 148 Red Tees – 108 Hdcp.# 18
A good iron shot here should result in an easy par, possible a birdie, depending upon pin placement for the day. There are sand traps in the front left and right and the upper left portion of the green is narrow and difficult to hit. The green is slightly elevated so use one more club and aim for the middle of the green unless you are very accurate with your irons.
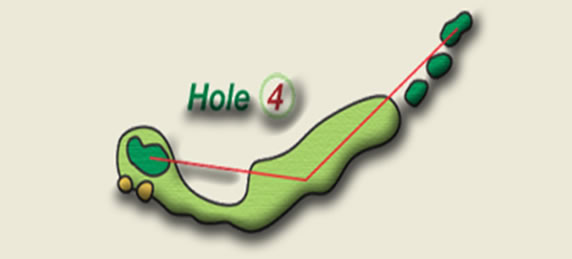
Hole 4 – Par 4 : Blue Tees – 418 White Tees – 375 Red Tees – 279 Hdcp.# 6
This is a pretty, dogleg – right Par 4 that demands accuracy and course management. The shorter right side skirts a lake and requires an approach shot over water and a greenside bunker. The left side has an elevated split fairway that set up an easier approach shot but requires a long drive to carry the bank and a guarding sand bunker, plus there are OB stakes left of the cart path if you pull the tee shot. The long green slopes down from right to left and can make a two – putt difficult if you are out of position with the pin. A good birdie hole for lower handicappers.
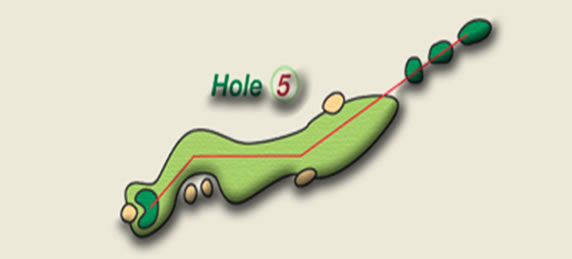
Hole 5 – Par 5 : Blue Tees – 520 White Tees – 480 Red Tees – 436 Hdcp.# 12
A “Risk/Reward” hole for longer hitters. A good straight drive into the wide fairway sets up a second shot of 200-300 yards to the green. But, a maze of sand traps guard the frontal approach to the green with a greenside bunker on the right and left rear to catch any errant shots. A safer second shot can be played out to the right for a short iron pitch to the large, gently sloped green. Shorter tee shots have to guard against a lake on the right but can lay – up short of the traps or hit to the non – bunkered right side and then play a mid – iron to the green.
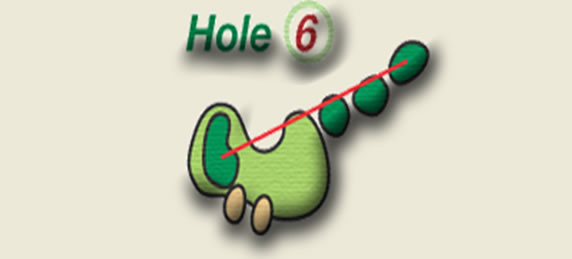
Hole 6 – Par 3 : Blue Tees – 186 White Tees – 160 Red Tees – 108 Hdcp.# 16
This Par 3 has a large green that looks rather narrow since it is on an elevated peninsula and nearly surrounded by water. There is a greenside bunker in front and one that curves around the left side. Use one extra club here for it is crucial to carry the green. Tee shots that hold this green should result in a par or birdie unless the ball is at the opposite end from the pin placement on this very wide green.
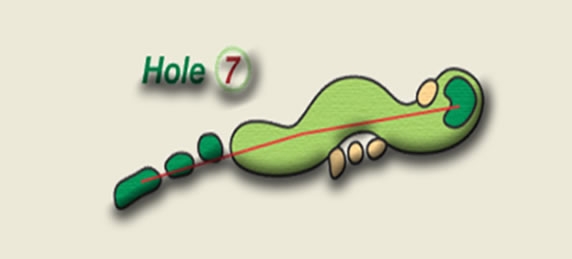
Hole 7 – Par 4 : Blue Tees – 396 White Tees – 350 Red Tees – 320 Hdcp.# 14
Distance off the tee can get you into trouble on this hole. Tee shots in the 200 – 240 range have a large, safe landing area but longer drives to the right side will likely catch one of the two fairway bunkers. Approach shots to the green need to be accurate for distance and direction. There are two large sand traps protecting the left side and a pot bunker in front. The green has a higher plateau in the rear center that affects putting considerably as it slopes down to the front and sides. Par is a good score on this hole but a definite birdie possibility for accurate players.
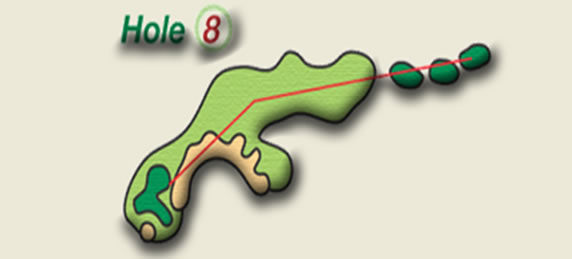
Hole 8 – Par 4 : Blue Tees – 426 White Tees – 406 Red Tees – 331 Hdcp.# 4
Another split-level fairway on #8 and a fairway bunker in the left center that should be avoided. Long drivers can usually fly over the fairway bunker and only have mid – to – shot iron into the green. However, the fairway trap is placed directly in the landing zone for most drives and will likely result in a bogie or worse if you don’t clear it. The right third of the fairway is elevated and offers a more direct shot to the green but is the longer route. A drive to the left of the bunker is the shortest distance to the pin but there is some heavy rough and a lake to the left of the fairway. Approach shots from the left side have to carry over the cart path, over other sand traps, and over a steep up-slope to a rather narrow green. The green slopes from back left to front right and is faster than most if you are above the hole. Par(Gross or net)is an excellent score here.
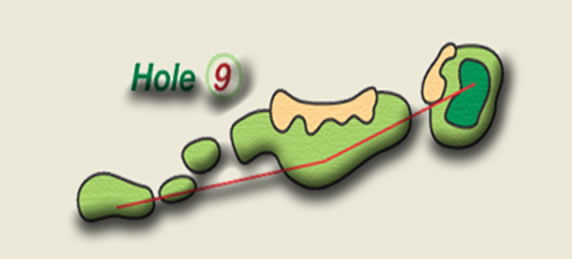
Hole 9 – Par 4 : Blue Tees – 416 White Tees – 384 Red Tees – 335 Hdcp.# 8
This is another deceptively difficult Par 4.Lots of water and sand that comes into play for both the tee ball and the approach shot. It is crucial to hit a fairly long drive into the fairway to set up a decent mid – to – long iron shot to the elevated, steeply sloped, and well – bunkered green. The entire length of this “Island” fairway is surrounded by water with multiple sand traps both left and right. The water should not be a factor with the tee shot but the sand bunkers on the right will catch any weak fades or slices while the sand on the left runs almost the full length of the fairway and will cause problems for errant hooks or pulls. Second shots here face a carry over a 20 – 30 yards portion of the lake to another peninsular green. There is heavy rough and a right greenside bunker guarding the 25 – 30 yard slope up to the green. A large bunker to the left rear catches any long pulls and most putts will face more break and speed due to the steeper slope from back to front.
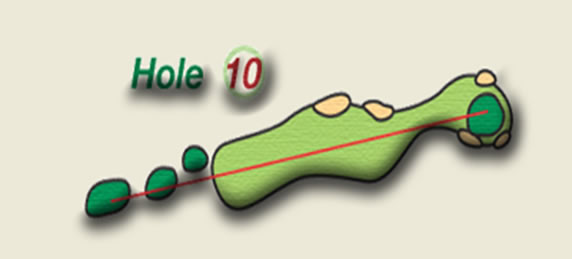
Hole 10 – Par 4 : Blue Tees – 413 White Tees – 366 Red Tees – 302 Hdcp.# 13
This is a straightway Par 4 with a reasonably wide fairway. There are a couple of bunkers in the left rough and OB stakes if the tee ball is hooked over the cart path. The right rough has some small hills and can produce difficult lies but any good drive in or close to the fairway will leave a mid – to – short iron to the elevated green. There is a bunker on the front left and one to the left rear. The right side has a steep upslope with think rough so it is important to carry the green with your approach shot. The higher right side has a small plateau for level putting but then slopes rather sharply down to the left front. There can be at least a two – club difference from hitting the left front or right rear of this green so the key here is the proper club selection for your approach shot.
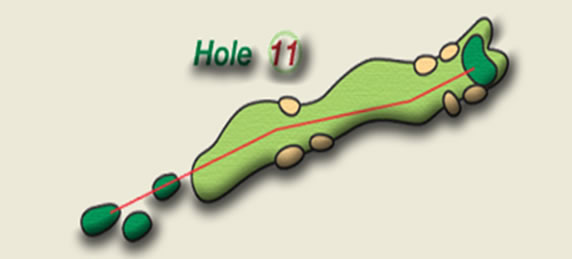
Hole 11 – Par 5 : Blue Tees – 532 White Tees – 485 Red Tees – 430 Hdcp.# 3
This is a rather short Par 5 with little water danger but the very elevated green with a bunker in front makes it difficult to reach the green with two shots. Two bunkers are in range of tee shots to the right (Small Lake if you’re really long). There is an OB line down the left side but not close to the obvious line of play. Some ridges and moguls run the full length of this hole so you often have an uneven stance on the second or third shot. Most approach shots come up a little short due to the elevation of the green but a lake curves around the back of hole no.11 and any shot that “Flies the green” will likely incur the water penalty.
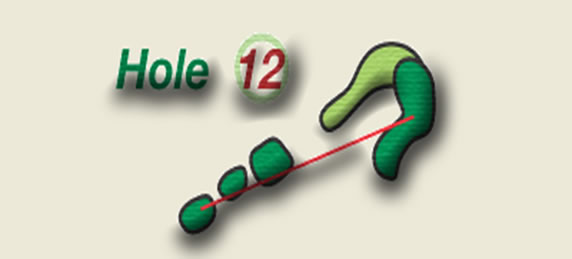
Hole 12 – Par 3 : Blue Tees – 181 White Tees – 155 Red Tees – 100 Hdcp.# 17
This is short Par 3 with an elevated green that slopes down from a wide left rear is a narrow right front. Short shots to the right will catch one of two bunkers and long shots will roll into a backside trap. Anything short to the middle will roll back down the fronting slope and shots to the left may catch another sand bunker or higher rough. An accurate iron here will present a good birdie opportunity or an easy par.
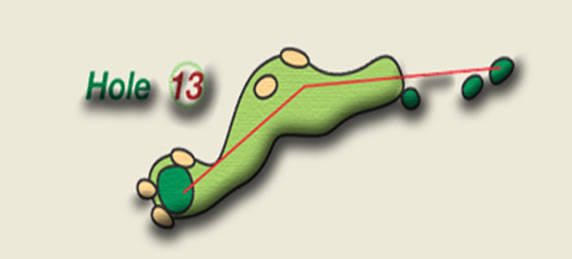
Hole 13 – Par 4 : Blue Tees – 467 White Tees – 429 Red Tees – 392 Hdcp.# 1
Properly handicapped, this dogleg left Par 4 calls for distance and accuracy from the tee and still leaves a long, uphill shot to a smaller elevated green. A lake runs down the left side of the fairway and into most of the approach paths to the green. The right side has high rough, ridges, and two large traps. A long drive down the right half of the fairway sets up a long iron or fairway wood shot to the green but usually from a slightly downhill lie. Most golfers should lay up short of the water, hit a second shot into the fairway short of the green, and then hope to get their short chip close to the pin. Bogie is not a bad score on this hole.
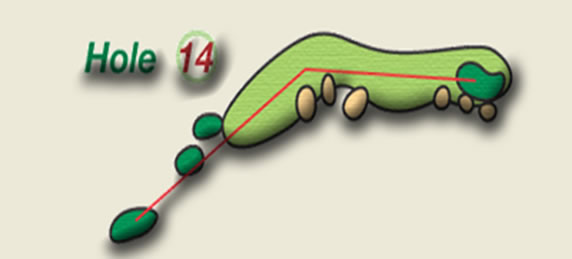
Hole 14 – Par 4 : Blue Tees – 423 White Tees – 396 Red Tees – 336 Hdcp.# 5
Not quite as intimidating as Hole 13 but this is another long Par 4 that also requires a long drive and an accurate approach shot with either a long iron or fairway wood. The hole doglegs slightly to the right but there are two traps on the edge of the right edge of the fairway that endanger attempts to shorter the hole with the tee shot. Drives on the left side are safer but leave a 200+ yard approach shot to an elevates green with a large trap in front and a steep bank of rough on the right. The green is large with lots of undulations but generally slopes from back right to front with another large bunker on the left edge.
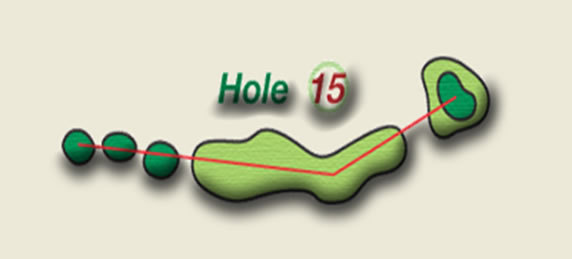
Hole 15 – Par 4 : Blue Tees – 413 White Tees – 370 Red Tees – 310 Hdcp.# 9
This is another Par 4 that features a fairly long approach shot over water to a well-bunkered and elevated peninsula green. Despite a lake on the left and ridges with high rough on the right, there is ample fairway for a good tee shot. A long drive down the middle makes this a relatively easy par hole but shorter drivers will have to lay – up short of the lake or risk penalty strokes. There is a pot bunker in front of the hole, another bunker on the left side, and moguls / depressions on the right. It is a large green that slopes from back to front so accurate approach shots will hold the green offer a chance to save a stroke with a good putt.
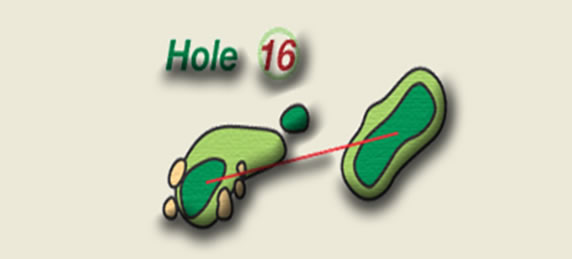
Hole 16 – Par 3 : Blue Tees – 236 White Tees – 207 Red Tees – 167 Hdcp.# 15
Don’t let that handicap fool you; this is a tough Par 3. The straight – line tee shot must carry several traps, a thick rough depression, and a steep up-slope. Anything short or left will make it very difficult to save par. The short “Fairway” approach curves in from the right and good draw with a long iron or fairway wood will make the green or leave an easy uphill chip to save your par. The right side has high rough, numerous trees, and a greenside bunker. Par is an excellent score here.
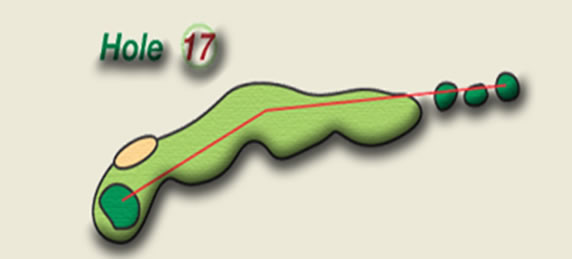
Hole 17 – Par 4 : Blue Tees – 446 White Tees – 371 Red Tees – 315 Hdcp.# 7
A good tee shot on this downwind hole will leave a short iron approach to a reception back to front sloped green. But, there are plenty hazards to penalize errant shots. A lake runs all down the left side with a couple of incursions into the fairway, the right side has some higher rough ridges and a couple of sand traps, an approach bunker on the left, a greenside bunker on the right, and the lake behind the green.
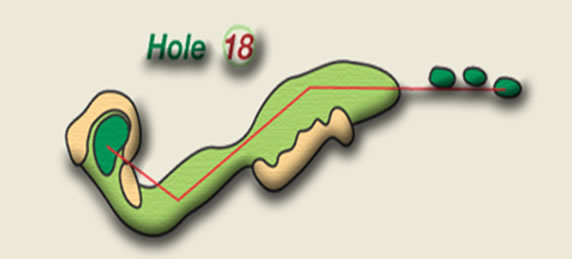
Hole 18 – Par 5 : Blue Tees – 536 White Tees – 500 Red Tees – 453 Hdcp.# 11
This spectacular final hole of the Summit Green Valley Chiangmai Golf Club is a beautiful Par 5 that curls around the left side of a shimmering lake with the Club House majestically in view behind this final green. There is also water and a series of sand bunkers on the left side but a wide fairway area to the right of the traps that extends approximately 300 yards before curving around the lake that extends to the green. Long drivers will have the opportunity to hit a second shot (200-230 yards) directly over the lake to set up a birdie or eagle possibility. There are traps to the left, left rear, and right of the green but a good shot clearing the water will hold the green. Most golfers will hit a lay up shot into the fairway curving left around the lake and approach traps. This safer approach leaves an easy short iron to the green and also provides a chance to finish with a birdie or easy par.
A Final note: Scoring well at Summit Green Valley Chiangmai Country Club is not easy. It requires good course management as well as good ball striking. However, just playing at Summit Green Valley Chiangmai Country Club will be a pleasant and memorable experience for anyone that loves the game and appreciates the beauty of a well tended and imaginative course layout. Hope you enjoy your round!